Your Summa photo
To be able to recognise you at school, for example for lessons and exams, we would like to receive a passport photo of you. It is important that we receive your photo before the classes start.
Your photo is only available for teachers and the administration and not for fellow students or others.
This page contains information on how to submit your photo.
If you experience problems, or it does not work as described, please look at the alternative methods for submitting your photo.
Requirements for your photo
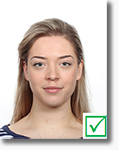 The photo must look like a passport photo and meet the following requirements:
- Most of the photo is filled with your face, no one else should be in it.
- Your face and eyes must be clearly visible, and don’t wear a hat or cap.
- Provide a sharp colour photo that is not too light or too dark
- You have to provide an unedited photo; no editing with snapchat or other filters.
- If you’re using an existing photo, make sure it is in portrait mode (like a passport photo). If necessary, crop the photo to the desired format (4:3) so that your face is clearly visible (Requirement 1).
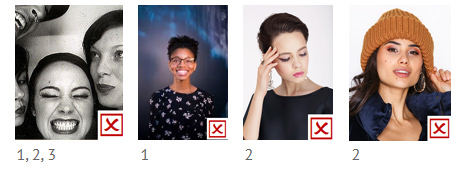
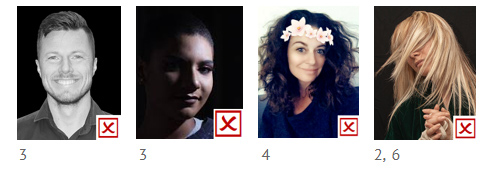
Examples of photos that do not meet the requirements
If the photo does not meet these requirements, it will be rejected. Below, you can see examples of photos that will be rejected.
On the website of the central government (in Dutch) you can see more examples. The requirements for the official passport photo are stricter than those of Summa College, however.
Submitting your photo
The administration of Summa College will send you an e-mail with the request to submit your passport photo. The e-mail contains an upload link that will take you to a personal web page. This upload link starts with
https://summacollege.educus.nl/app/upload?code=.
Please click on the link in the email to go directly to the upload page.
Upload page
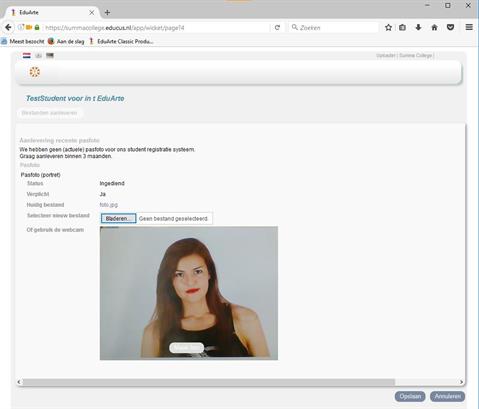
Your name is shown at the top of the page, the Status indicates the last action for this upload request.
- "Openstaand": nothing has been submitted yet
- "Ingediend": you have submitted a photo earlier, but it has not yet been reviewed.
- "Geaccepteerd": the photo has been approved by the administration and is now in our system
- "Geweigerd": the photo has been rejected by the administration
At "Huidige bestand" you will see the latest submitted photo file. This is empty at your first when you submit a photo.
If your webcam is recognised, the image will appear under "Of gebruik je webcam".
You can submit the photo in two ways:
- If you use the camera on your phone or a webcam on your computer/laptop you can take a picture right away.
- If you already have a photo on your phone or computer/laptop, you can submit that file.
Taking a picture with your phone camera or webcam
If the image of your camera is shown in the photo window, you can submit the photo by taking a photo directly from the upload page using the "Maak foto" button at the bottom of the photo window.
After taking the photo, it will be shown in a framed window. Here you can crop the photo and zoom in and out.
Use the mouse to drag the photo inside the frame and the plus (+) and minus (-) buttons to zoom in and out. If the photo is not to your liking, you can always restart with the "Nieuwe foto" button.
If you are satisfied with the result, send the photo by using the "Opslaan" button. If you submitted the photo successfully you will be thanked.
Submitting an existing photo
You can use an existing photo on your phone or computer/laptop. It is important that it is in portrait format, not landscape format.
To use an existing photo, select the "Bladeren" button under "Selecteer nieuw bestand". The name of the selected file will now (partly) be shown next to the "Bladeren" button. Then send the selected image by using the "Opslaan" button. If you submitted the photo successfully you will be thanked.
If the photo does not have the correct format, you will be notified. In that case, please edit the photo on your phone or computer/laptop. After editing, choose the custom photo as described above.
Editing a photo in Windows 10
It is impossible to describe all the ways in which you can edit a photo. That's why we’ve limited ourselves to describing the standard Windows 10 Photos programme for cropping and zooming in and out of the photo.
Start the programme by right-clicking on the photo and choosing "Edit with Photos".
- Select "Crop and rotate"
- Select "Height to width ratio" and select format 4:3
- Select "Height to width ratio" and "Portrait" if the frame is still in landscape mode
- Reduce the frame at the edges and then drag the photo inside until the optimal passport photo is shown
- If you're satisfied, choose "Done". Select "Reset" to start again (at 2)
Choose Save to replace the original file or choose "Save a copy" to save the custom photo separately (the file name is given a serial number, see the bar at the top of the window).
Tips & tricks / Alternative methods for submitting your photo
If submitting via the upload link does not work, try this:
- If you don't see a photo window, your camera or webcam is not be recognised by the upload page.
You can try if the webcam works if you open the upload link in another browser (e.g. Chrome, Edge, Firefox and Opera). If this doesn't work either, you can submit the photo by selecting a file on your phone or computer/laptop. If it doesn't work on your phone, try it with your computer/laptop. - If this still doesn’t work, you can also submit the photo in one of these two ways:
1. Choose your photo and change the filename into your student number. Send the photo file to the email address of your school administration, preferably from your school email address. Always clearly state your student number and your name.
2. Register with the administration to take a photo.